
Setting up Automatic Replies in MS Outlook
Outlook is an extensive PI (Personal Information) Manager Software System by Microsoft. Many organizations use Outlook for sending emails, storing contact information, and managing calendars. Among many, one of the distinctive features of Outlook is Automatic Replies.
This article explores the significance of automatic replies and the steps of setting them up.
Automatic Replies
This significant feature of Outlook allows you to inform your team about your absence and saves them from scheduling any discussions and meetings requiring your presence.
Usually, automatic replies are enabled when one is OOO (Out of Office) or to have a greeting message.
Steps to Set an Automatic Reply
To set up an automatic reply for OOO message or a greeting message in Outlook, follow the steps below:
1. Login to your Outlook account using your official credentials.
2. Click on the Settings icon in the top right corner. This opens the Settings popup.
3. Click on Automatic replies from the left sidebar.

4. To set up a simple automatic reply for an indefinite period of time (For example: A greeting message), do the following:
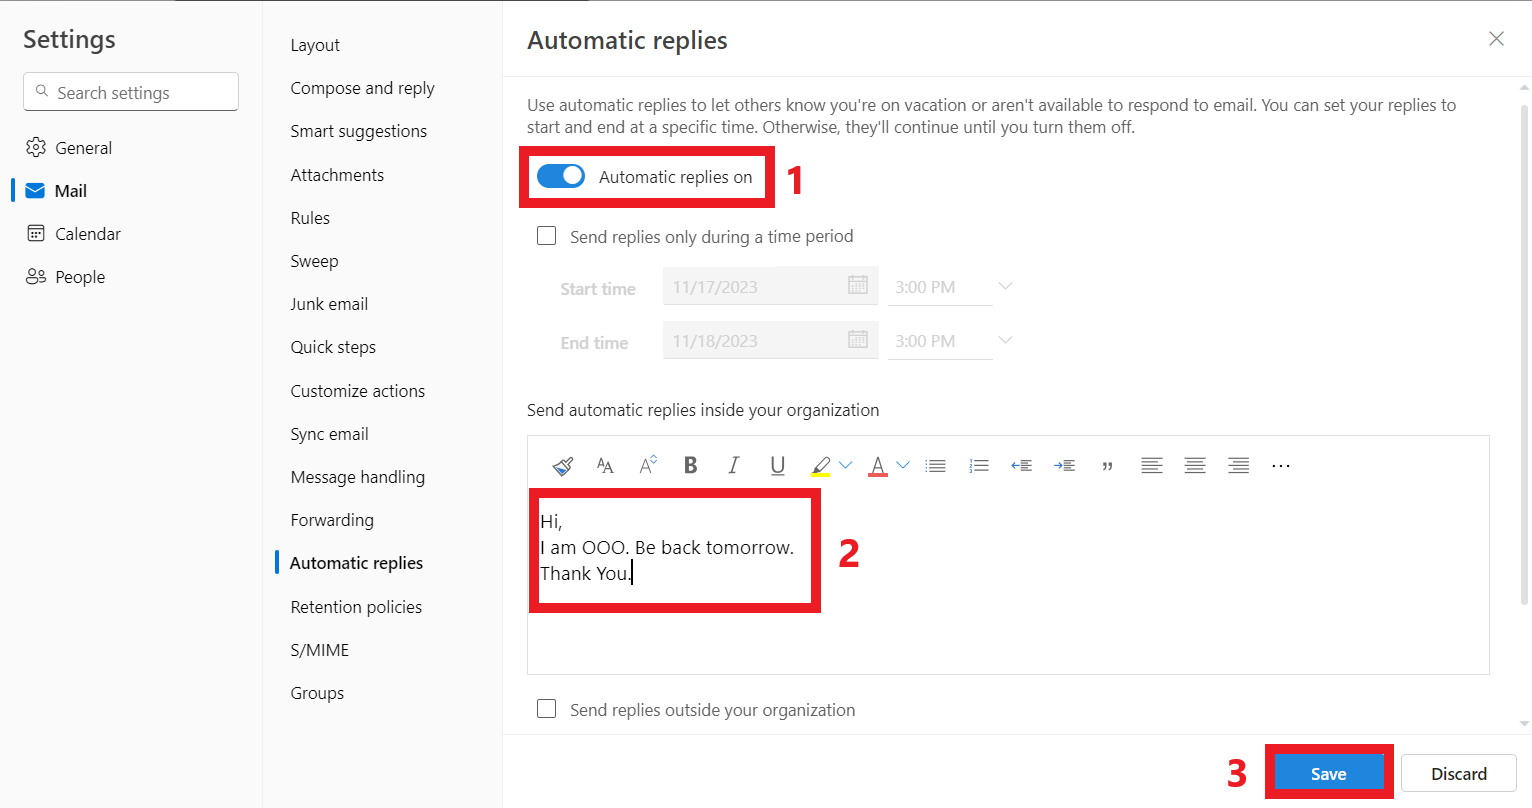
1. Enable the Automatic replies on toggle.
2. Type in your automated message. Note that the automated message should be concise and convey only the necessary information. Navigate to this link to study some good examples of OOO messages.
5. To set an automated message for a specific period of time (For example: An OOO message), do the following:
1. Mark the checkbox Send replies only during a time period.
2. Set the Start time and End time.
3. You can also block your calendar by enabling the Block my calendar for this period checkbox. Similarly, you can utilize the automatically decline new meeting invitations and decline and cancel my meetings in this time options.
4. Set the title for blocking your calendar.
5. Type in the message.

6. You can specify a different message for the people outside your organization. For that, enable the Send replies outside your organization option and type in your message.
7. After making all the changes, click on the Save button.

Note: The steps use the Outlook web application as a source of reference for the screenshots. However, the steps remain quite similar for the desktop application too.
To conclude, it’s always a professional practice to set up automatic replies when you are unavailable in the office to make coordination and scheduling easier for your colleagues.
To make the best use of this Outlook feature and more capabilities of Microsoft 365, reach out to our coaches.